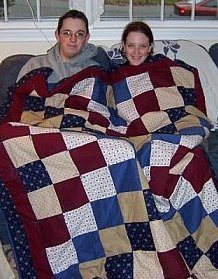
Here is a picture of my very first quilt:

The pattern is Trip Around the World (I used Trip Around the World in only 8 Hours by Jane C. Smith). As I mentioned in my "About Me" section, when I arrived at the class, I didn't even know how to work my sewing machine. However, I quickly learned and a beautiful twin sized quilt came to be. I remember spending hours at the JoAnns with my mom trying to pick out the perfect 6 fabrics. To this day, I don't like one of the selections, but my mom and the other ladies at JoAnn's said it was great! I knew all along I wanted to have maroon and blue. It was a matter of coming up with the remaining accent colors. The Trip Around the World directions suggested getting coordinating colors and placing them in varigating order. I definitely didn't do that, but I am still pleased with the results. In fact, when you create the Trip Around the World, you do half the quilt and then the other half. You are supposed to put the top together so that you get concentric diamonds. I put my together backwards so I ended up with a giant X pattern. I wish I could put up a picture of the quilt laying on a bed, but as you'll see below, I can't.
Now, on to the advice. A few things I learned during the creation of my first quilt: maintaining a quarter inch seam allowance is imperative. On my machine, the quarter inch seam can be measured by the edge of the foot. See what happens when you don't maintain the right seamage:
 Yikes! The batting is exposed! And let me tell you, it is difficult to hand stitch up these rips. In fact, it gets worse when you wash the quilt. So be conscious of your seam allowance when you are cutting and sewing the quilt!
Next problem: the sun!
For the first few years I had this beautiful quilt, I used it as a bed spread. We kept the heat very low in my old ap artment so it pleasantly kept me cozy and warm. The quilt stayed in pretty good shape because it spent most of its time spread out. Then, when I moved to a warmer climate, I bought a beautiful quilt stand, hoping to display my first quilt prominently in my living room. For over a year, it stayed in the same spot, smack dab in front of the living room picture window. One day, I passed by it to open up the window, and I noticed the sun damage. Alas! The formerly beautiful quilt had been permanently damaged. Though I can still display it on the quilt stand, I can no longer lay it out on a bed. As they say, live and learn!
 artment so it pleasantly kept me cozy and warm. The quilt stayed in pretty good shape because it spent most of its time spread out. Then, when I moved to a warmer climate, I bought a beautiful quilt stand, hoping to display my first quilt prominently in my living room. For over a year, it stayed in the same spot, smack dab in front of the living room picture window. One day, I passed by it to open up the window, and I noticed the sun damage. Alas! The formerly beautiful quilt had been permanently damaged. Though I can still display it on the quilt stand, I can no longer lay it out on a bed. As they say, live and learn!
No comments:
Post a Comment