
Friday, December 11, 2009
Christmastime!
Well, I was sad to realize that it would be unsafe for me to put up my tree this year. Crazy Cassy the kitten would knock it down for sure and probably eat some of it too. My holiday decor would not be complete. Luckily I'm a resourceful quilter so if I can't have an actual Christmas tree, the next best thing is a quilted Christmas tree! How fun it was to make and decorate this little tree!
Thursday, October 29, 2009
Happy Halloween!!
 I made this quilt for Halloween and I think it's as cute as can be! But it's missing one thing.... a little black cat!!!
Awww... Cassy just blends right in!!

Thursday, October 22, 2009
Cassandra
 I recently adopted an adorable kitten. Her name is Cassandra, but I call her Cassy. She's just as cute as can be. These pictures are, of course, of Cassy, but they also illustrate some of the many quilts I have around my home.
Cassy is full of energy and excitement. She loves to follow me around from room to room and always has to sleep near me. In fact, she is on my lap right now as I type! She seems to have no fear ( for example, one of her favorite places to sit is the refrigerator!!) but I found out tonight that she is afraid of one thing: my sewing machine. She doesn't like the sound of it at all and even ran to the other room when I started sewing! Silly kitty!
Tuesday, August 25, 2009
Recent projects!
So it's been a while since I posted. I've been working on two projects:
1. a series of baby quilts to donate to carewear at Christmas
2. a crazy quilt for my bed
I have 7 baby quilts done so far. I am making them very tiny (some only 14"x 14") for the NICU. Because they are so small, I can make them very quickly. I am using this project to practice new techniques and machine quilting methods. The one thing I haven't remember to do yet is take pictures so hopefully those will be coming soon.
The crazy quilt is, well, crazy! It started out as one square, using a crazy quilting method I read about in my Quilter's World magazine. One square turned into enough squares for a full sized quilt. And the crazy part is that I had enough fabric at home for the entire quilt top!!! I am working now on embellishing and embroidering the top, using both machine and hand sewing. I hope to have it done by winter, so look for a photo soon!
Thursday, July 16, 2009
Dress Shirt Quilt
So, I've been wanting to make this post for a long long time, but I thought I "lost" the photographs on my computer. In an effort to be more organized with my digital pictures, I started putting all my quilt photos in a folder called "Quilts." (Clever, I know!) But then I forgot I had started doing that so I was searching and searching around by date, trying to find these particular shots. Finally, they resurfaced!!
When my parents were cleaning out my grandmother's house, they found a quilt top. My mom had no idea the story behind it, but she kept it to give to me. My grandmother always told us stories about important things in her house ("This vase was a wedding present." "This silver spoon belonged to your great-grandmother.") so I was shocked that we had never heard a word of this quilt, even though I had been a quilter for years, and my grandmother used to brag to her friends about her quilting granddaughter! Anyway, the quilt to p was very cool because it was made out of what appears to be men's dress shirts! So I wonder, was this quilt made of my grandfather's dress shirts? Or had it belonged to one of my great aunts? Or did my grandmother pick it up at a yard sale? (All plausible theories)
 p was very cool because it was made out of what appears to be men's dress shirts! So I wonder, was this quilt made of my grandfather's dress shirts? Or had it belonged to one of my great aunts? Or did my grandmother pick it up at a yard sale? (All plausible theories)
This was the "easiest" quilt I've done because the hard part (which is also the fun part) -- cutting and sewing the fabric for the top -- was already done. All I had to do was get binding and a backing and put it together. I decided not to put on any borders because there was no way I would be able to find fabrics similar to these old dress shirts. Plus, the quilt was already queen-sized, without borders, so I didn't want to make it any bigger (I only have a limited amount of space on my living floor to spread out my work!). Here it is being displayed on my bed. Because it looks so good on my bed, I didn't want to give it away, but I had planned from the start to give it to my brother!
Monday, June 29, 2009
 I made this quilt for my good friend for her 29th + 1 birthday. When I make quilts, I always have colors in mind, colors that remind me of the person, either because of what they wear or how they have their home decorated. This fabric was fun. I bought just a small amount on E-Bay, coordinating cat fabric with cream and maroon backgrounds. Unfortunately, I couldn't find a solid background color that was the same shade of maroon (silly dye lots!) so somehow, I was able to contact the seller who I bought the fabric from last year and ask the name of it
 . And even more remarkably I found it on the internet. I ordered 6 yards, and they shipped from England. The quilt came out great!
Tuesday, June 9, 2009
Holidays, continued
So though today isn't a national holiday, I think it should be. Es mi cumple. :-) Therefore, I am going to write about an actual national holiday -- Christmas! My first year in the apartment with my roommates, I made a crazy quilt tree skirt as well as stockings:


 (Whoops! We hadn't decorated the tree before it crashed into the TV... luckily, there was no damage!)
Merry Christmas in June, everyone!

 (Whoops! We hadn't decorated the tree before it crashed into the TV... luckily, there was no damage!)
After I moved to my own place, I continued my Christmas decorating with a quilt (mentioned in the previous post) as well as a Log Cabin pillow:


Merry Christmas in June, everyone!
Monday, June 8, 2009
Holidays -- thanks to E-bay

 So a while back, I discovered the most amazing thing. On E-Bay you can buy pre-cut squares of coordinating fabric (the sellers usually sell pre-cut blocks of fabric in sets -- usually 4 different fabrics, ten blocks of each for a total of 40 blocks). It's a great deal -- someone makes money by doing the hard part of rotary cutting block after block of fabric. After discovering this on E-Bay, I bought a set of Irish fabrics, in green and white, and decided to make a St. Patrick's Day quilt. The plan was to use it only during the month of March, but I have loved it so much I use it all the time when I wrap up on the couch. Because all the squares were pre-cut, I couldn't do strip piecing, so it did take a little bit of time (and a lot of thread) to sew the top together. I had 4" squares of green fabric and 4" squares of white fabric so I alternated the colors, not paying mind to what the actual pattern was on the fabric, as long as the background color alternated green and white. All the fabrics had some sort of Irish theme. I had been taught in my quilting classes to use a solid color for the backing, but I had found the cutest, softest leprachaun fabric that I couldn't resist for the back!!
 After the success of the St. Patrick's Day quilt, I decided to try my hand at a Christmas quilt. I used the s
 ame concept -- this time alternating red, white and green squares. I did have a lot of Christmas fabric from pervious projects but I still bought a bunch of precut squares from E-Bay. I also raided my mother's fabric stash! In fact, the candy cane border, which you can see to the right, is left over fabric from the school play in second grade! Thanks, Mom!! The quilt top came out great, but I didn't want to just do a plain red or green backing. So I splurged and bought novelty fabric for the back. I just couldn't resist these adorable Christmas kitties.
Monday, May 18, 2009
Bright colors!


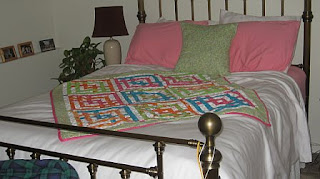
Okay, so I am killing time before I head to the Nationals baseball game, so I figured I had time for one post. In this post, you will see the Carpenters Square pattern:(http://www.quilterscache.com/C/CarpentersSquareBlock.htmlww.quilterscache.com/C/CarpentersSquareBlock.htmlww.quilterscache.com/C/CarpentersSquareBlock.html). The Quilter's Cache rates this pattern 3 pins (like stars) in terms of difficulty so there is a reason this quilt only had nine blocks! My friend Jamie, a fellow quilter, sent me the most beautiful collection of fat quarters for my birthday so I decided to practice this difficult pattern with them. I had originally thought I could make purses from the squares since they are 11" squares, which is perfect for small purses, but I liked how they turned out so much, I made a small quilt for myself and decided to completely redecorate my bedroom so I could use it, even though the quilt itself can't be more than 36X36. The Carpenter's Square is very time consuming because you can't easily do strip piecing. Each piece has to be sewn individually. The majority of my time making this quilt was cutting the fabric to the various sizes (2" square, 2" X 4" strips, 2" X 6" strips, etc) But the final results are great. I put together this quilt over Christmas, while I was home at my parents. You'd be surprised to know that their cats, Boots & Bella, were excellent assistants. Bella (ironically, since she's the shy one) enjoyed getting in between the top and the batting when I was tying the quilt!
Here it is finally finished. Don't I look proud?!?! (and maybe a bit relieved!)

So I have never really had a great bedspread for my brass bed, and I had been using an old comforter of my grandmother's with pastel flowers, but I wanted to incorporate this bright floral quilt into my bedding scheme. So, I went out and bought a white duvet cover and filled it with batting (I thought an actual feather comforter would be too hot) and I bought other new bright colored accessories. I'm not sure if I love the results, but it's starting to grow on me:

So I have never really had a great bedspread for my brass bed, and I had been using an old comforter of my grandmother's with pastel flowers, but I wanted to incorporate this bright floral quilt into my bedding scheme. So, I went out and bought a white duvet cover and filled it with batting (I thought an actual feather comforter would be too hot) and I bought other new bright colored accessories. I'm not sure if I love the results, but it's starting to grow on me:

Thursday, May 14, 2009
Purses
Upon the advice of my quilting teacher, I purchased a book on the Log Cabin quilt pattern (Make a Quilt in a Day: Log Cabin Pattern by Eleanor Burns). Though I  am yet to make an entire
  Log Cabin Quilt, I have used the pattern in numerous projects such as pillows and purses. Here are some of the purses I've made over the years. It's great to be able to make your own purses because when I wanted a brown purse, I didn't have to run around to a bunch of stores looking for one. I just made one, exactly to my own specifications! Purses also make great gifts. However, I have a bad bad habit of giving them away before I photograph them! I know I've made at least one tote bag, two purple purses, one green purse and two multi-colored purses for friends & family members. Someday I would like to be able to sell my purses on e-Bay or at a craft fair. :-)
am yet to make an entire  Log Cabin Quilt, I have used the pattern in numerous projects such as pillows and purses. Here are some of the purses I've made over the years. It's great to be able to make your own purses because when I wanted a brown purse, I didn't have to run around to a bunch of stores looking for one. I just made one, exactly to my own specifications! Purses also make great gifts. However, I have a bad bad habit of giving them away before I photograph them! I know I've made at least one tote bag, two purple purses, one green purse and two multi-colored purses for friends & family members. Someday I would like to be able to sell my purses on e-Bay or at a craft fair. :-)
I also made tote bags for my flute choir members and myself. We used to play at a number of nursing homes at Christmas and at other events throughout the year. The tote bag (the pattern is in the log cabin book mentioned above) is the perfect size to fit music, the flute and a stand. It also makes a great carryon for the plane!
Wednesday, May 6, 2009

Marine Comfort Quilts
One day, I was taking the elevator up to my office and I was glancing at the Wall Street Journal. I saw an article on the front page about Marine Comfort Quilts, an organization that makes quilts for the next of kin of military members who have passed away in the wars in Afghanistan and Iraq. Though it is called Marine Comfort Quilts, they provide quilts to the families of all branches of the military. Now, I had a lot of left over patriotic fabric from Mike's quilt so I thought I would make a few squares. The organization requested that all squares be 12".


 Here is a close up of the square that has made it on the Navy quilt in the above link. Due to my affinity for all things Navy, I saw this fabric at at JoAnns and just had to buy it! Of course, I bought way more than I would ever need, but it's a great fabric to use for this cause!!!


In addition to the satisfaction I got from helping a worthy organization, I like participating with Marine Comfort Quilts because I can try out new square patterns and use up old scraps of fabrics. And, check this out. I can see that at least one of my squares made it on a quilt:
 Here is a close up of the square that has made it on the Navy quilt in the above link. Due to my affinity for all things Navy, I saw this fabric at at JoAnns and just had to buy it! Of course, I bought way more than I would ever need, but it's a great fabric to use for this cause!!!
Every couple of months I go through my fabric and make up a few more squares. I am probably about due for another batch, and according to the website, Marine Comfort Quilts is in need of 127,830 squares! I'd better get going!!!!
Sunday, May 3, 2009
More Gifts
In the spring of 2005, I took a trip to Europe where I started noticing the patterns of every day things -- the tiles on a church roof, the sidewalk bricks in a row, etc. They all started looking like quilt patterns to me!! I could tell this new hobby was taking root in my brain. The two quilts featured in this post were inspired by a brick pattern in Prague. The fist one was for my friend Mike. His quilt was a challenge because many fabric are flowery or at least feminine. Due to his Navy background , I chose a patriotic, nautical theme. With this pattern, you alternate one solid 4" inch square and one 4" inch square made of 4 smaller squares. I also mitered the corners on this quilt as well. This is also the first quilt I mailed. I was worried about it getting wet en route so I wrapped it in several plastic bags and put it in a sturdy box. I also decided to overnight it where it arrived at Mike's doorstep in perfect condition. I also insured it for $100.00. My quilts are priceless, but I would be devestated if something happened to it!!
Erica and me in front of Radio City Music Hall in New York City in 2003:

Rest in peace, Erica!!
 , I chose a patriotic, nautical theme. With this pattern, you alternate one solid 4" inch square and one 4" inch square made of 4 smaller squares. I also mitered the corners on this quilt as well. This is also the first quilt I mailed. I was worried about it getting wet en route so I wrapped it in several plastic bags and put it in a sturdy box. I also decided to overnight it where it arrived at Mike's doorstep in perfect condition. I also insured it for $100.00. My quilts are priceless, but I would be devestated if something happened to it!!
I used the same pattern for my next quilt, a gift for my dear friend Erica. Sadly, Erica had been recently diagnosed with le ukemia and was in the hospital for her first round of chemo and first bone marrow transplant. Erica loved the color purple, so it was a natural selection for the quilt. Fortunately, there are myriad purple fabrics at the store and in fact, I had trouble picking the perfect shades and perfect patterns. To this day, of all the quilts I've made, Erica's is my favorite. I used a contrasting thin green border to differentiate the purple quilt from the purple borders. I had always been told to use complementary colors, but I found the pop of green to be a delightful addition to the quilt.
 ukemia and was in the hospital for her first round of chemo and first bone marrow transplant. Erica loved the color purple, so it was a natural selection for the quilt. Fortunately, there are myriad purple fabrics at the store and in fact, I had trouble picking the perfect shades and perfect patterns. To this day, of all the quilts I've made, Erica's is my favorite. I used a contrasting thin green border to differentiate the purple quilt from the purple borders. I had always been told to use complementary colors, but I found the pop of green to be a delightful addition to the quilt.
 I am sad writing this post because Erica passed away this spring on March 7th after a heroic 4 year battle with cancer. She endured 7 bone marrow transplants and 37 bone biopsies. Though cancer eventually took her life, she was an inspiration to all who knew her. I was blessed to have met her in 6th grade and have maintained a great friendship throughout our high school, college and post college days. Our world will never be the same without her, but I take comfort in knowing that she is not suffering, and she is dancing in Heaven with the angels.
Erica and me in front of Radio City Music Hall in New York City in 2003:
Rest in peace, Erica!!
Thursday, April 30, 2009
Gifts
After I made my first quilt, I started making quilts for family and friends. My two roommates at the time were the first reci pients. The below quilt was the second I made, while still taking the class. It was interesting because it only took 6 fat quarters (as well as some white fabric) to make the front. Ali chose her own color scheme, a beautiful purple and navy. Though the quilt is a little small (short of twin sized), it is lovely; the color scheme is fantastic the way it is varigated and alternating. It's called the Brick Wall, and it's put together by sewing strips and then staggering them to make the brick pattern. The white blocks hold the whole thing together. When I was a beginner, I hand tied my quilts, as suggested by my teacher. In my old apartment, this was quite an undertaking as I had to move around all the living room furniture to make room for the quilt. I use embroidery floss (the heavy duty kind) doubled-up to tie the three layers of the quilt. In this case, I was going to cut the ends of the knots, but Ali said she liked them long, so I left them as is. Since I always have extra fabric, I made a matching pillow as well (sitting in the rocking chair next to me in the photo).
After the Brick wall quilt, I immediately started making a quilt for my other roommate. I was overly ambitious and decided to do a Lone Star quilt. LUCKILY I was still enrolled in the class because I needed a lot of help from my teacher. The Lone Star pattern is more advanced, using diamonds to create a big star shape. Unfortunately, I don't have a picture of this quilt but I do have a close up of the color scheme. I'm hoping to get a picture of the final quilt up here one of these days because I tell you, it will be the one and only Lone Star Quilt that I will ever make. The pattern involved cutting strips of each color and sewing them together. The trick was to rotary cut the sewn strips at a 45º angle to create the diamond shapes. Though having the strip pre-sewn was supposed to be a time saver, I really struggled to maintain the correct angle. But in the end, the quilt came together, and Julie was happy with the results. The yellow flower fabric, purchased at Jo-Ann's, is one of my all time favorites for its bright sunny nature and its ease of coordination with other colors and patterns.
 pients. The below quilt was the second I made, while still taking the class. It was interesting because it only took 6 fat quarters (as well as some white fabric) to make the front. Ali chose her own color scheme, a beautiful purple and navy. Though the quilt is a little small (short of twin sized), it is lovely; the color scheme is fantastic the way it is varigated and alternating. It's called the Brick Wall, and it's put together by sewing strips and then staggering them to make the brick pattern. The white blocks hold the whole thing together. When I was a beginner, I hand tied my quilts, as suggested by my teacher. In my old apartment, this was quite an undertaking as I had to move around all the living room furniture to make room for the quilt. I use embroidery floss (the heavy duty kind) doubled-up to tie the three layers of the quilt. In this case, I was going to cut the ends of the knots, but Ali said she liked them long, so I left them as is. Since I always have extra fabric, I made a matching pillow as well (sitting in the rocking chair next to me in the photo).
After the Brick wall quilt, I immediately started making a quilt for my other roommate. I was overly ambitious and decided to do a Lone Star quilt. LUCKILY I was still enrolled in the class because I needed a lot of help from my teacher. The Lone Star pattern is more advanced, using diamonds to create a big star shape. Unfortunately, I don't have a picture of this quilt but I do have a close up of the color scheme. I'm hoping to get a picture of the final quilt up here one of these days because I tell you, it will be the one and only Lone Star Quilt that I
 will ever make. The pattern involved cutting strips of each color and sewing them together. The trick was to rotary cut the sewn strips at a 45º angle to create the diamond shapes. Though having the strip pre-sewn was supposed to be a time saver, I really struggled to maintain the correct angle. But in the end, the quilt came together, and Julie was happy with the results. The yellow flower fabric, purchased at Jo-Ann's, is one of my all time favorites for its bright sunny nature and its ease of coordination with other colors and patterns.
Finally, that spring, I completed a quilt for my sister. This quilt was instrumental in my progression as a quilter for two reasons. One, it was the first time I purchased fabric on E-Bay and two, it was the first time I machine quilted a quilt (opposed to hand tying). I want to give E-Bay a big shout out as I have purchased yards of fabric over the years and I have been very satisfied with all the sellers. In fact (as I'll get to in a later post), you can often buy pre-cut squares of varying coordinating patterns (I like the 4" squares). But more on that later. Kim's quilt was a fun one as it incorporated her current love for panda bears. I purchased the panda border fabric on E-Bay and then was lucky enou gh to find the matching bamboo fabric at Jo-Ann's. I used a pattern from about.quilts.com which was okay, but I felt the instructions could have been more detailed. This was also the first time I had to miter the borders of my quilt so the pandas could keep walking.... walking....walking.
 gh to find the matching bamboo fabric at Jo-Ann's. I used a pattern from about.quilts.com which was okay, but I felt the instructions could have been more detailed. This was also the first time I had to miter the borders of my quilt so the pandas could keep walking.... walking....walking.
 The pinwheel pattern was challenging as well, and from making this quilt, I realized I don't like triangles. In fact, I don't think I've made a quilt with triangles since. But the end result, just shy of a twin sized, was great. As I mentioned before, I wanted to machine quilt this quilt as it didn't have the regular square pattern good for hand tying (like placing a knot every 3 blocks, for example). I thought it might be easier to use fusible batting so that the three layers didn't slip up when I was coaxing them through my machine, so I did, and I spend a good portion of the afternoon ironing the quilt to the fusi ble batting on my hardwood dining room floor. However, I came to realize that some fusible battings will gunk up your sewing maching needle, so I would not recommend it. The easiest thing to do when you want to machine quilt on a regular sewing machine is to baste (with pins) the quilt in many places to secure the three layers. So, after ironing the fusible batting, I machine quilted the pattern around each of the pinwheels and also along the edge of the border. Then I had to wash the quilt to get rid of the fusible batting stuff from the inside of the quilt. The end result was great, but this quilt has a heavy feeling (not as soft and cuddly as my other quilts) which I think is because of the fusible batting.
 ble batting on my hardwood dining room floor. However, I came to realize that some fusible battings will gunk up your sewing maching needle, so I would not recommend it. The easiest thing to do when you want to machine quilt on a regular sewing machine is to baste (with pins) the quilt in many places to secure the three layers. So, after ironing the fusible batting, I machine quilted the pattern around each of the pinwheels and also along the edge of the border. Then I had to wash the quilt to get rid of the fusible batting stuff from the inside of the quilt. The end result was great, but this quilt has a heavy feeling (not as soft and cuddly as my other quilts) which I think is because of the fusible batting.
 Wednesday, April 29, 2009
The work begins!
Well, as I was going through all my photos last night, I realized how many quilts and other crafts that I have given as gifts that I forgot to photograph!! However, in the next few days I am going to be posting all of the pictures of quilts I do have. I will try to post instructions or at least links to the patterns I used as well as any words of wisdom I might have gleaned from the creative process.
 Yikes! The batting is exposed! And let me tell you, it is difficult to hand stitch up these rips. In fact, it gets worse when you wash the quilt. So be conscious of your seam allowance when you are cutting and sewing the quilt!
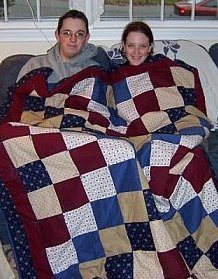
Here is a picture of my very first quilt:

The pattern is Trip Around the World (I used Trip Around the World in only 8 Hours by Jane C. Smith). As I mentioned in my "About Me" section, when I arrived at the class, I didn't even know how to work my sewing machine. However, I quickly learned and a beautiful twin sized quilt came to be. I remember spending hours at the JoAnns with my mom trying to pick out the perfect 6 fabrics. To this day, I don't like one of the selections, but my mom and the other ladies at JoAnn's said it was great! I knew all along I wanted to have maroon and blue. It was a matter of coming up with the remaining accent colors. The Trip Around the World directions suggested getting coordinating colors and placing them in varigating order. I definitely didn't do that, but I am still pleased with the results. In fact, when you create the Trip Around the World, you do half the quilt and then the other half. You are supposed to put the top together so that you get concentric diamonds. I put my together backwards so I ended up with a giant X pattern. I wish I could put up a picture of the quilt laying on a bed, but as you'll see below, I can't.
Now, on to the advice. A few things I learned during the creation of my first quilt: maintaining a quarter inch seam allowance is imperative. On my machine, the quarter inch seam can be measured by the edge of the foot. See what happens when you don't maintain the right seamage:
 Yikes! The batting is exposed! And let me tell you, it is difficult to hand stitch up these rips. In fact, it gets worse when you wash the quilt. So be conscious of your seam allowance when you are cutting and sewing the quilt!
Next problem: the sun!
For the first few years I had this beautiful quilt, I used it as a bed spread. We kept the heat very low in my old ap artment so it pleasantly kept me cozy and warm. The quilt stayed in pretty good shape because it spent most of its time spread out. Then, when I moved to a warmer climate, I bought a beautiful quilt stand, hoping to display my first quilt prominently in my living room. For over a year, it stayed in the same spot, smack dab in front of the living room picture window. One day, I passed by it to open up the window, and I noticed the sun damage. Alas! The formerly beautiful quilt had been permanently damaged. Though I can still display it on the quilt stand, I can no longer lay it out on a bed. As they say, live and learn!
 artment so it pleasantly kept me cozy and warm. The quilt stayed in pretty good shape because it spent most of its time spread out. Then, when I moved to a warmer climate, I bought a beautiful quilt stand, hoping to display my first quilt prominently in my living room. For over a year, it stayed in the same spot, smack dab in front of the living room picture window. One day, I passed by it to open up the window, and I noticed the sun damage. Alas! The formerly beautiful quilt had been permanently damaged. Though I can still display it on the quilt stand, I can no longer lay it out on a bed. As they say, live and learn!
Tuesday, April 28, 2009
And so it begins!
Okay, hello everyone. I have decided today I am going to maintain a blog to show off all my quilting adventures. I started quilting about 4 years ago and have made many gift quilts as well as other items such as belts and purses. It will take a while to get this blog caught up on all my creations, and I'm sure I'll share a little bit about life in there as well. Enjoy!
Subscribe to:
Comments (Atom)
